Interior Design
Full-service decorating that blends high and low, vintage finds with modern pieces for spaces that feel personal and collected.
Learn More
DIY Projects
Step-by-step tutorials for refinishing furniture, sewing pillows, styling bookshelves, and transforming rooms on a budget.
Learn More
E-Decorating
Personalized design guidance delivered online — perfect for clients anywhere in the world who want a professional eye.
Learn More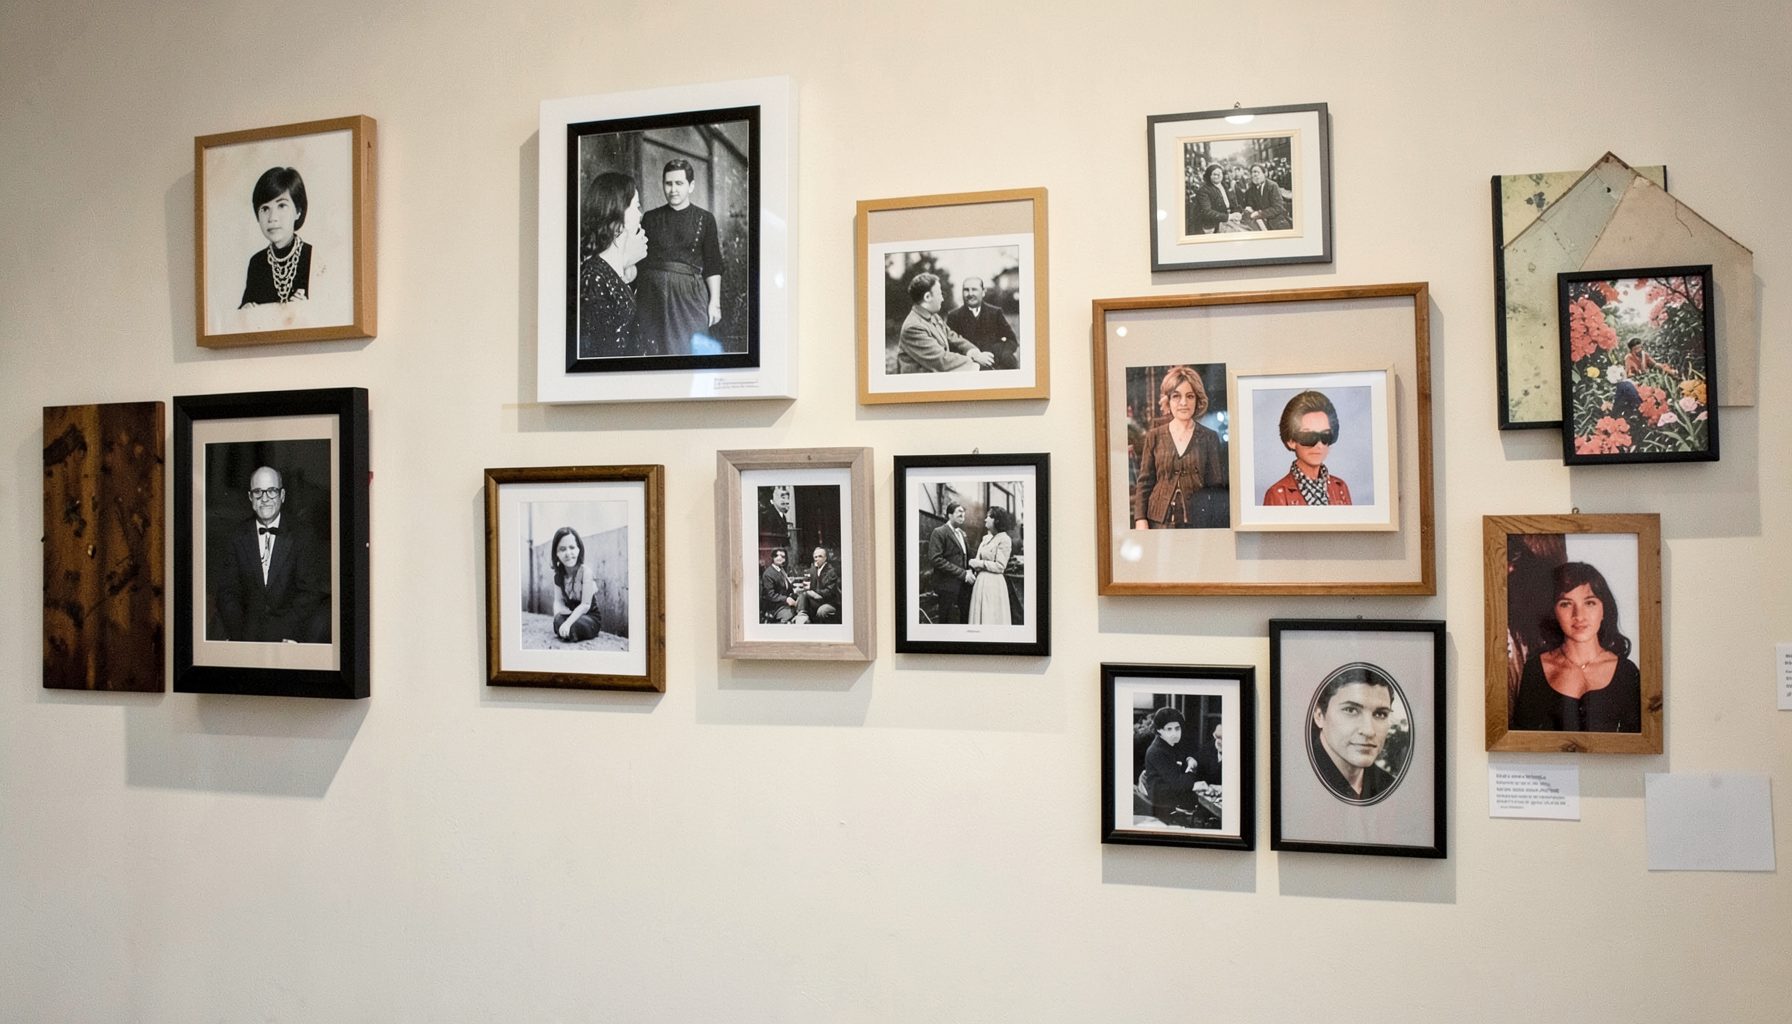
Portfolio
Browse completed room makeovers, before-and-after transformations, and styling projects from Bay Area homes.
Learn More
Blog
Interior design inspiration, fashion finds, entertaining ideas, and peeks into real home renovations and styling projects.
Learn More
Downloads
Free curated resources for home decorating and design — guides, checklists, and inspiration to help you get started.
Learn MoreCrafting a Layered Family Photo Wall Using Salvaged Vintage Frames
A blank wall in a hallway, above the sofa, or along the staircase landing can feel like a quiet invitation. Filling it with framed family photographs turns that bare space into a small museum of the people and places that matter most. When the frames themselves carry a bit of history through worn gilt, chipped enamel, or hand-carved details, the wall starts to feel collected rather than styled, which is the heart of what makes a layered, personal display so compelling.
In Australia, where many homes feature a mix of brick veneer, weatherboard, and plasterboard construction, the search for character-rich frames often leads to weekend op shops and busy community markets. Picking through stacks of old frames on a lazy Saturday arvo is a small ritual in itself. The trick is approaching the hunt with a loose idea of what you want so each piece feels chosen, not merely accumulated.
This kind of project rewards patience, a steady hand on the level, and a willingness to live with the arrangement for a few days before committing. The five sections below walk through the steps that turn a random pile of frames and a shoebox of prints into a wall that holds the family story, with vintage charm built into every layer.
Sourcing Frames from Op Shops and Weekend Markets
Op shops run by Salvos, Vinnies, and the RSPCA are reliably the best starting point for affordable vintage frames. The bigger stores in Melbourne, Sydney, and Brisbane tend to cycle through furniture and homewares every week, so a quick scan on a Saturday morning can yield ornate gilt pieces, simple oak borders, and weathered timber samples in a single visit. Prices are usually modest, and most staff are happy to set aside frames they know a regular customer likes.
Weekend markets add a different flavour. The Camberwell Sunday Market, Sydney's Paddy's Markets in Haymarket, and Adelaide's Thebarton Theatre markets are legendary for stacks of pre-loved frames sold by traders who know the difference between reproduction and original. Bring a small measuring tape, a list of the sizes you need, and a sturdy bag so you can carry several pieces without chipping the corners. If a frame has broken glass, ask for a discount, then swap the glazing for fresh acrylic at a later stop.
Australian homeowners are often surprised by the variety at Bunnings, where the picture framing aisle offers off-the-shelf sizes in weathered finishes that mimic vintage styles. Mixing one or two of these budget-friendly pieces with genuine salvage frames keeps the wall from looking uniform while protecting the wallet. The goal is texture rather than a single era, and a few readily available frames are an easy way to bridge the more precious finds.
Holding several frames together on the floor before buying is the secret move. Stack them edge to edge, lay them in a rough rectangle, and see how the colours and shapes talk to one another. If the grouping feels balanced, the wall will too. If anything jars, leave it behind and wait for the next market day.
Planning the Composition Before Touching a Nail
Once the frames are home, the fun begins. Lay every piece flat on the living room floor in the general order you imagine for the wall, then move them around until something clicks. Magazine cutouts in matching sizes can stand in for photos you have not yet printed, and scraps of coloured paper help test how different images will read at a distance. This is the stage where the personality of the wall really takes shape.
Australians often centre a gallery wall above a piece of furniture like a low sideboard, a sofa, or a hallway console, which provides a clear anchor. A guideline that works in most homes is to keep the centre of the arrangement roughly 150 centimetres off the floor, around eye level for the average household. From that anchor, work outwards, keeping the spacing between frames a consistent two to four centimetres. Too tight crowds the eye, while too wide a gap makes the wall feel scattered.
A quick template method saves hours of patching holes later. Trace each frame onto butcher's paper or old newspaper, label each template with a small number, then tape them to the wall with low-tack painter's tape. Stand back at different times of day to see how the Australian sun, often intense and low through east or west-facing windows, hits the arrangement. Adjust the spacing until the layout feels calm from the lounge as well as the front door.
Photographing the templates with a phone once the layout is final makes future hanging easier. A printed reference image taped to the wall beside the templates also helps if you are working with a second pair of hands. Take a few moments now to enjoy the design phase before the drill comes out, perhaps pausing for a quick afternoon unwind to keep the creative energy fresh.
Combining Photos with Art and Other Treasured Pieces
A gallery wall stays interesting when the contents stretch beyond photographs. Mix in a child's painting in a simple timber frame, a pressed botanical from a favourite holiday spot, a wedding invitation in a slim shadow box, or a postcard brought home from a coastal road trip. These quieter pieces bring relief between busier portraits and turn the wall into a layered story rather than a row of faces.
For Australian homes with strong natural light, consider how prints will react to direct sun. Older family photographs, especially early colour prints from the seventies and eighties, can fade quickly when hung opposite an unshaded window. Choosing archival-quality paper and slipping UV-filtering glass or acrylic into vintage frames is a small expense that buys decades of stable colour. Position the most irreplaceable pieces on walls that receive indirect light, and rotate them occasionally to even out any fading.
Vary the orientation of frames as well. A vertical family portrait between two horizontal landscapes breaks the visual rhythm just enough to keep the eye moving. Mix ornate gilt edges with simple flat timber and the occasional brightly painted frame, perhaps one rescued from a council cleanup with a chipped coat of seafoam green. The contrast between polished and worn finishes is what gives the wall that collected-over-time feel.
If a frame is missing its original backing, replace it with foam board from an art supply shop, cut to size with a sharp utility knife. Foam board keeps the back flat against the wall and gives small clips or wires a sturdy anchor. Adding fresh acid-free matting lifts an average photograph and rescues a frame that looks too large for the image it holds, a common issue when buying frames secondhand.
Mounting Frames on Plasterboard and Brick Veneer
Australian walls are typically either plasterboard over a timber frame, or brick veneer with a render finish. Each needs a slightly different approach. For plasterboard, picture hooks rated for the frame's weight work for pieces up to about five kilograms. Heavier vintage frames with thick ornate mouldings often need a wall plug and screw, ideally anchored into a stud when possible. A small stud finder costs very little and saves a lot of frustration when the wall is hollow beneath the surface.
Brick veneer, common in newer Queensland-style homes and many suburban builds across the country, takes a masonry drill bit and plastic wall plugs. Pre-drill slowly on a low setting, vacuum the dust as you go, and use screws rated for outdoor use if the wall is exposed to moisture. Hang heavier frames with two screws spaced to spread the load. Always lift the frame onto the hook rather than sliding it, so the wall stays unmarked.
For misaligned nails, a quick set of cornice repair sticks or a small pot of premixed wall filler handles most small gaps after repositioning. Keep these on hand along with a damp cloth so a quick repair is always possible between visits from family or guests. This is also handy when rearranging a gallery wall every few months as the family grows.
Step back several metres once everything is in place. The arrangement should read as a single visual shape, often a loose rectangle or an organic oval, with no frame sticking out as an obvious afterthought. Tweak the spacing on any piece that drifted from the whole. The wall is finished only when the family can stand in the room and feel that every photograph belongs there.
Refreshing the Wall Without Starting from Scratch
Gallery walls built with thrifted vintage frames are wonderfully adaptable. As children grow, new family members join, or favourite holidays are taken, swap a photograph inside an existing frame rather than buying a new one. Most vintage frames open with a flathead screwdriver, and a fresh print pressed into the back can transform a frame in minutes.
Seasonal swaps are also a simple pleasure. Replace a summer beach shot with a cosy winter scene, or move a black-and-white wedding portrait into the lounge and pull a colour group shot into the hallway. The wall stays current without losing the carefully arranged layout, which means fewer nail holes and a faster refresh each time. A small album of prints sorted by mood makes the swap easy on a slow weekend.
Over years, the wall becomes a record of the household itself. A frame holding a toddler's scribble at five years old sits beside the same child at graduation, and a faded print of an ancestor shares space with a recent coastal holiday. This slow layering is what makes a vintage-led gallery wall feel timeless rather than trendy, and what keeps family photographs in daily view rather than tucked away in a drawer.
Keep a few spare templates from the original paper layout folded in a drawer, and use them whenever a new piece arrives. They drop onto the wall beside an existing hook so new additions slip into place without rearranging the whole composition. With a little care, the gallery wall becomes one of the most loved features of the home, growing slowly as the family does, framed in pieces that have lived before and will keep living on.

Recent Projects